If you’ve ever been to our gym or taken one of our KINSTRETCH classes, you know we do exercises called PAILs and RAILs. But what exactly are they, and why do we use them so often?
PAILs and RAILs are stretching and strengthening methods from Functional Range Conditioning (FRC), a system developed by Dr. Andreo Spina. PAILs stands for Progressive Angular Isometric Loading, and RAILs stands for Regressive Angular Isometric Loading. (Trust us, abbreviating it makes it way easier.)
These techniques, PAILs and RAILs, are not just about stretching. They are designed to create significant and lasting improvements in joint function. They retrain the nervous system, restructure the tissues, and build active control in newly acquired ranges of motion. In essence, PAILs and RAILs are the key to not just moving better, but staying better. They are the secret to unlocking your body’s full potential and achieving better mobility and joint health.
Progressive vs. Regressive: What’s the Difference?
When we discuss a joint’s progressive and regressive sides, we refer to the direction of tissue behavior relative to the joint angle.
-
Progressive side: The side that is being stretched as the joint angle increases.
-
Regressive side: The side that is shortening as the joint angle decreases. Example: Ankle Dorsiflexion
-
Progressive side: The calf (lengthening as you flex the ankle)
-
Regressive side: The shin (shortening to pull the ankle into deeper dorsiflexion)
Knowing which side is doing what helps us load the right tissues at the right time, which is exactly why PAILs and RAILs are so effective.
Understanding the biomechanics behind each movement isn’t just for coaches—it’s for anyone serious about unlocking their body’s full potential.
The Benefits of Isometric Loading
An isometric contraction is when a muscle generates force without changing its length. You already know examples include planks, wall sits, and yes—PAILs and RAILs.
Here’s why isometric loading is one of the most underutilized but powerful tools in training:
- Safe: Since there’s no dynamic movement, the load remains within the capacity of your joint structures.
- Scalable: You can dial the intensity up or down based on your needs.
- Precise: You can target specific tissues without needing heavy external loads.
- Efficient: Isometrics often cause less tissue damage than dynamic work, meaning quicker recovery.
In fact, many elite rehab protocols center around isometrics before reintroducing dynamic work. Nothing builds strength, control, and resilience in vulnerable positions like isometric training. This training empowers you to build strength, control, and resilience, making you more prepared for the challenges of your fitness journey.
Isometric training is a gateway to better control, stronger muscles, and healthier joints. Integrating it into your routine ensures that you’re not just gaining range—you’re owning it.
Understanding the Law of Irradiation
“A muscle working hard recruits neighboring muscles, and if they are already part of the action, it amplifies their strength.”
That’s Sherrington’s Law of Irradiation in a nutshell—and it’s a huge reason why PAILs and RAILs are so potent.
When you create full-body tension (irradiation), your nervous system fires harder, creating stronger, more stable contractions. If you’re trying to gain control over your ankle during dorsiflexion PAILs/RAILs, recruiting tension through your entire body amplifies the effectiveness of that local effort.
That’s why, during PAILs and RAILs, we often cue you to “lock everything down,” not just the target area.
Maximizing systemic tension allows you to turn isolated work into a full-body event, which helps solidify the neural pathways needed for better joint control.
The PAILs/RAILs Protocol: Step-by-Step
Although you can customize PAILs/RAILs for different joints and goals, the general method stays the same.
Step 1: Find the Stretch
First, place the target tissue under a deep, passive stretch. You’ll want to stay here for at least two minutes. Longer holds—up to five minutes—are even better for “teaching” the nervous system that this range is safe.
Pro Tip: Focus on controlled, rhythmic breathing to help your body relax and accept the stretch.
Example: In ankle dorsiflexion, you’d lean into a deep calf stretch while keeping the foot flat and heel down.
Patience during this phase is crucial. Think of it as preparing fertile ground before planting the seeds of strength.
Step 2: Create Full-Body Tension (Irradiation)
After the passive stretch, start creating systemic tension—brace your core, squeeze your fists, tighten your glutes—so the whole body is actively engaged.
Keep breathing—shallow and controlled, not breath-holding.
Step 3: Maximum Voluntary Contraction (MVC)
Now, start ramping up the intensity in the progressive tissue (the stretched side).
- Begin at about 10% effort.
- Gradually build to 100% or your safe maximum contraction.
Imagine you’re “pressing” against an immovable force, but without letting anything actually move. Take 10–20 seconds to build up.
Note: Not every set requires 100% effort. 50–70% may be plenty, depending on your session goal.
Learning to scale effort during MVCs teaches your body how to regulate force, which is vital for real-world activities where strength needs to be adaptable.
Step 4: Perform the PAILs Contraction
Once you hit your maximum safe effort, hold the contraction for at least five seconds (sometimes up to 15 seconds for deeper training effects).
This is the Progressive Angular Isometric Loading—trying to “fight” the stretch while maintaining position.
Step 5: Switch to the RAILs Contraction
Without fully relaxing, flip the focus to the regressive tissue—the side trying to “close” the joint angle.
For ankle dorsiflexion, think about pulling your foot deeper into the stretch by firing the muscles along the shin.
Again, hold for five to fifteen seconds, depending on the goal.
This active engagement on both sides of the joint cements control over your new range of motion, reducing the risk of injury.
Step 6: Find the Stretch Again
Finally, after the contractions, relax fully and settle back into the stretch. Notice how much more accessible the new range is—this is your body adapting in real time.
Stay here for another 30–60 seconds if time allows, breathing deeply and letting the tissues “absorb” the gains.
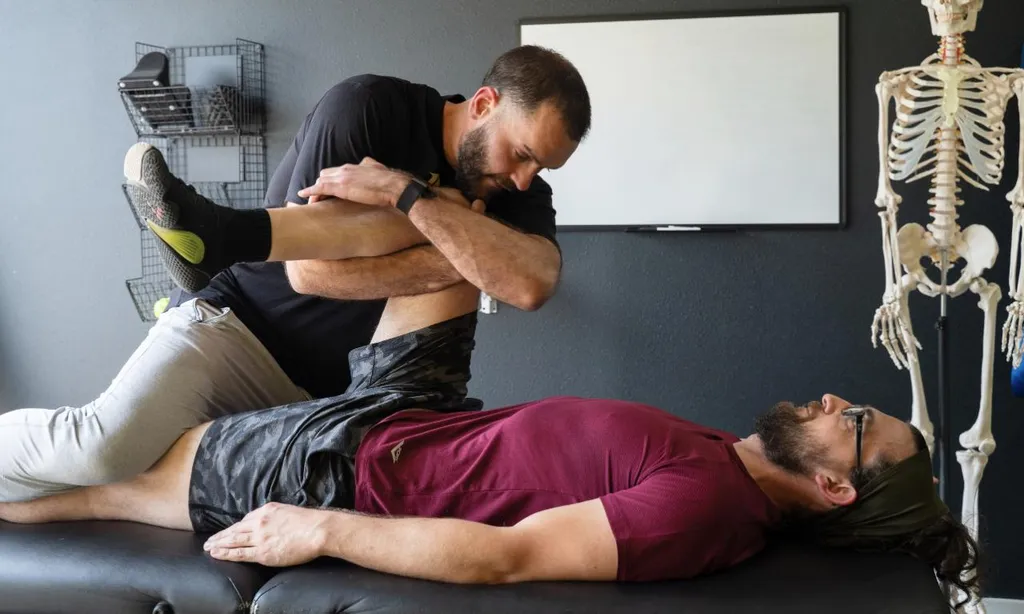
Practical Example: Ankle Dorsiflexion PAILs/RAILs
Here’s a quick demo of me setting up for ankle dorsiflexion PAILs/RAILs to tie it all together.
- Stretch the calf passively for 2–5 minutes.
- Create full-body tension.
- Gas pedal the foot against the ground, building slowly to a MVC (PAILs contraction) for 10–15 seconds.
- Reverse and pull the shin upward into deeper dorsiflexion (RAILs contraction) for 10–15 seconds.
- Relax, stretch deeper. Result: Better ankle dorsiflexion, stronger end ranges, less “tightness” felt during squats, running, and daily movement.
Performing PAILs/RAILs consistently leads to permanent improvements in joint function, giving you access to ranges that were previously restricted or weak.
Why PAILs/RAILs Work (And Why You Should Care)
Most stretching focuses only on passive flexibility. But passive flexibility without control is a ticking time bomb.
PAILs and RAILs give you active, usable mobility—the ability to control and produce force at your end ranges. That’s the difference between “kind of flexible” and resiliently mobile.
Building this kind of strength isn’t just about fitness—it’s about longevity. It’s about making sure your body is still capable of doing the things you love decades from now.
If you want joints that move freely, resist injury, and perform better, PAILs and RAILs should be a staple in your routine.
TL;DR
- Find the stretch in the target tissue.
- Ramp up tension slowly (MVC).
- Perform max-effort contraction in the progressive tissue (PAILs).
- Switch to max contraction in the regressive tissue (RAILs).
- Relax and explore your new range.
- Repeat as needed to build bulletproof joints.
Final Thoughts: Stretching Redefined
Understanding and practicing PAILs/RAILs isn’t just “next-level” stretching—it’s an entirely different category of training.
If you have stubborn joints, recurring aches and pains, or want to move with more freedom, it’s time to experience what true mobility training feels like.
Schedule a call with us today. We’ll show you why most stretching falls short—and why you’re capable of so much more.
Remember: Strength at your end ranges isn’t a luxury. It’s the foundation for long-term movement health.
References:
- Muscle damage produced by isometric contractions in human elbow flexors
- Current Concepts in Muscle Stretching for Exercise and Rehabilitation
Written by
Brian Murray, FRA, FRSC
Founder of Motive Training
We’ll teach you how to move with purpose so you can lead a healthy, strong, and pain-free life. Our headquarters are in Austin, TX, but you can work with us online by signing up for KINSTRETCH Online or digging deep into one of our Motive Mobility Blueprints.